Accessing Kubernetes Services Using Cloudflare Zero Trust

In this tutorial I want to show you how secure access to services running inside a kubernetes cluster, this is useful for Dev teams specially when they require to test certain endpoints or access services without exposing the development environment which is a security risk for any organization.
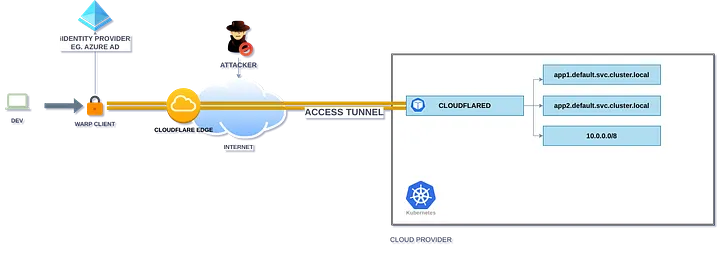
The diagram shows the following process:
- Client installs warp client on his device (Mac,Linux,Windows)
- Client login on zero trust domain of the organization.
- According of the policies assigned from warp via its IdP (Azure active directory in this use case) access to a dev private network will be granted
- Now Client can open its browser or interact with the cluster as a local user through a tunnel managed by Zero Trust.
Requirements
You will need a working kubernetes cluster and a cloudflare account with Zero Trust enable, in this example I used minikube.
Setup Kubernetes Services
The following yaml file contains a nginx server, exposed through port 80, with ClusterIP.
1
2
3
4
5
6
7
8
9
10
11
12
13
14
15
16
17
18
19
20
21
22
23
24
25
26
27
28
29
30
31
32
apiVersion: apps/v1
kind: Deployment
metadata:
  name: mi-nginx-deployment
spec:
  replicas: 3
  selector:
    matchLabels:
      app: mi-nginx
  template:
    metadata:
      labels:
        app: mi-nginx
    spec:
      containers:
      - name: nginx
        image: nginx
        ports:
        - containerPort: 80
---
apiVersion: v1
kind: Service
metadata:
  name: mi-nginx-service
spec:
  selector:
    app: mi-nginx
  ports:
  - name: http
    port: 80
    targetPort: 80
  type: ClusterIP
Save this file as mi-nginx-svc.yaml and run kubectl apply -f mi-nginx-svc.yaml, check your service with kubectl get services. Notice that network 10.0.0.0/8 is unreachable outside the cluster.

Setup Cloudflare Access Tunnel
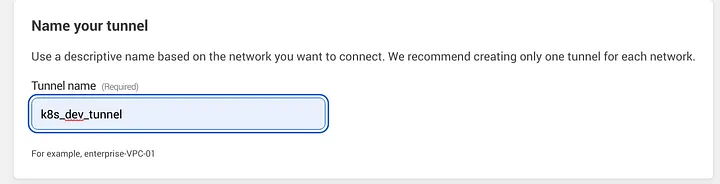
Go to cloudflare zero trust dashboard -> tunnels -> create a tunnel and name your tunnel
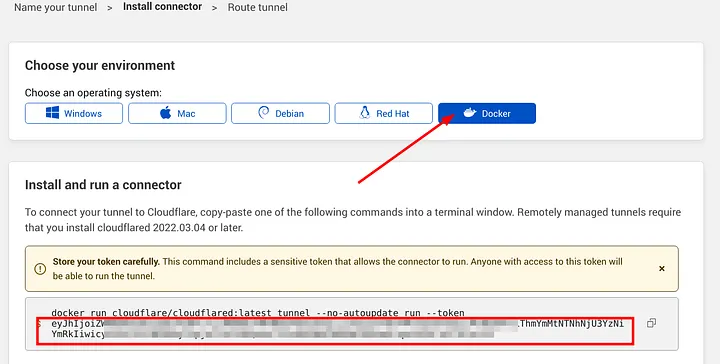
Here, select docker as environment and save the auto generated token, this token will be used to authenticate the cloudflared deployment in k8s to establish a connection backwards with the tunnel. (Remember to send this token as a kubernetes secret).
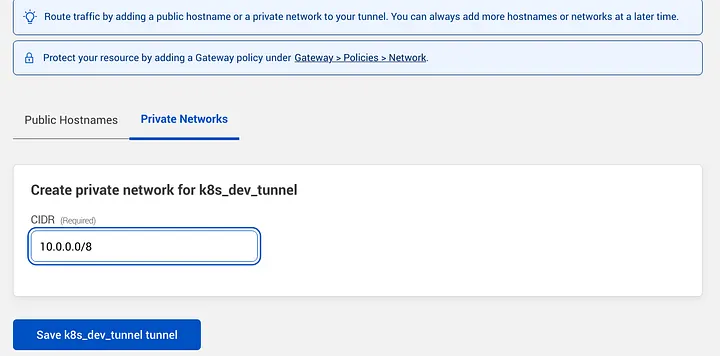
Then click next and go to private networks tab, add your private network CIDR and save.
Setup Cloudflared Deployment
Now, we have to deploy cloudflared, save the following yaml as cloudflared_deployment.yaml and run kubectl apply -f cloudflared_deployment.yaml remember you may want to set more replicas, edit this file as needed.
1
2
3
4
5
6
7
8
9
10
11
12
13
14
15
16
17
18
19
20
21
22
apiVersion: apps/v1
kind: Deployment
metadata:
  labels:
    app: cloudflared
  name: cloudflared
spec:
  selector:
    matchLabels:
      app: cloudflared
  template:
    metadata:
      labels:
        app: cloudflared
    spec:
      containers:
      - name: cloudflared
        image: cloudflare/cloudflared:2023.1.0
        imagePullPolicy: Always
        args: ["tunnel", "--no-autoupdate", "run", "--token={TOKEN}"]
      restartPolicy: Always
      terminationGracePeriodSeconds: 60
Run kubectl get deployments, after this check zero trust dashboard > tunnels section, your tunnel should be on active state (as today, there’s a bug in cf, showing degraded state in the dashboard, if you get that your tunnel should be okay).

Setup Local DNS Resolution
cloudflare warp client excludes private IP ranges from external DNS resolution by default, to reach a private network in this range Eg. 10.0.0.0/8 or any other private network range we need to exclude it from the local domain fallback list:
Go to Settings > Network
Firewall > Proxy, then enable UDP
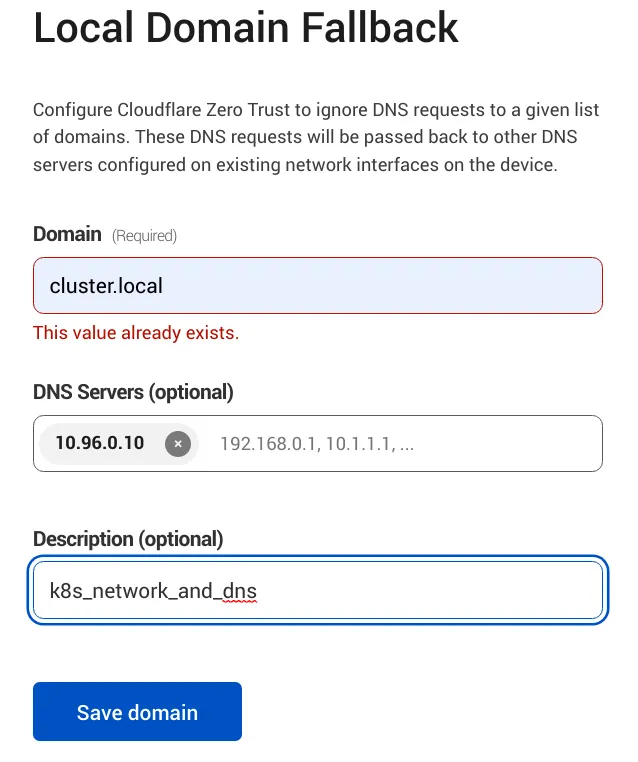
Go to Settings > warp client > Device Settings > Default profile > Local Domain Fallback
Here, we need to add the domain name that will be resolved externally by the external dns server in this case k8s local dns server, the default domain name in my case will be *.cluster.local no need to add * as its shown in the image below.
If you need to get the DNS server address of your kubernetes cluster you can open a shell into a existing pod eg. nginx and cat /etc/resolv.conf file.

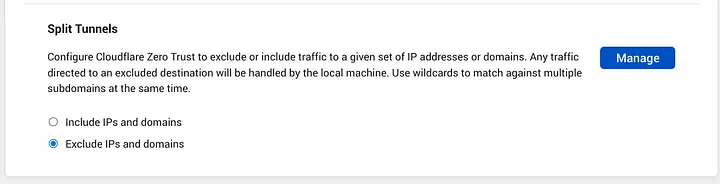
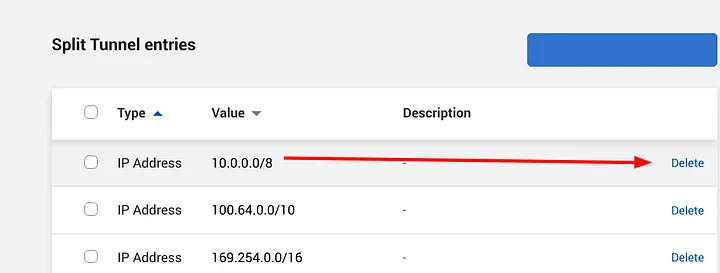
Now, go to Settings > warp client > Device Settings > Default Profile > Split Tunnels, should be set on “Exclude IPs and domains”, then click on Manage.
Here, we must delete the network range we want to reach, this action will make cloudflare send queries to this network 10.0.0.0/8 and will allow to be resolved remotely, this way we will be able to reach our private k8s network.
Securing Access with WARP Client
Now, will define who can access our private resources:
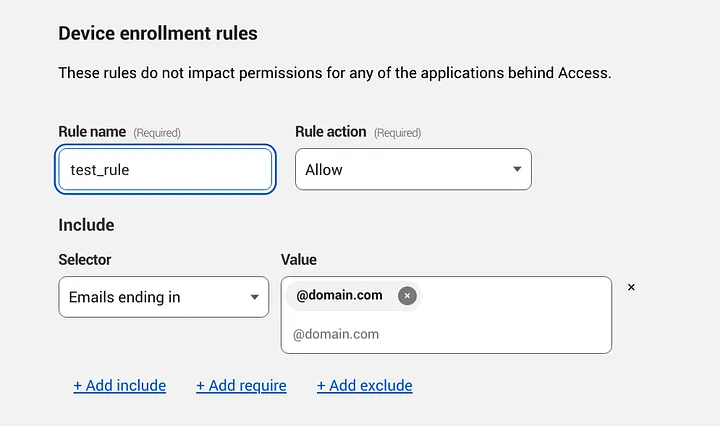
Go to Settings > Warp > Device enrollment permissions
Add a new rule, in this example I will allow my @domain users to enroll devices in our organization warp client.
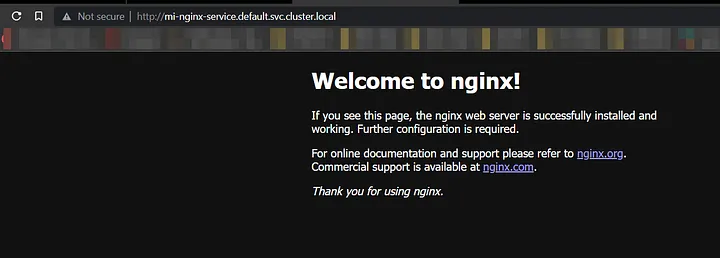
Finally, after installing the warp client and enrolling your device into your organization zero trust domain you will be able to open and interact with the services on your development cluster.
References
- https://developers.cloudflare.com/cloudflare-one/connections/connect-apps/private-net/connect-private-networks/#route-private-network-ips-through-gateway
- https://developers.cloudflare.com/cloudflare-one/connections/connect-apps/private-net/private-hostnames-ips/
- https://developers.cloudflare.com/cloudflare-one/connections/connect-apps/deployment-guides/kubernetes/
- https://developers.cloudflare.com/cloudflare-one/tutorials/many-cfd-one-tunnel/
- https://developers.cloudflare.com/cloudflare-one/tutorials/warp-to-tunnel/
- https://kubernetes.io/docs/concepts/services-networking/dns-pod-service/